Telescope Control Tutorial Part 2
In this part of the tutorial we will:
- Learn how to connect Radio Eyes to the Telescope Control Point Program
(TCPP).
- Send simple one-time move commands to the telescope from Radio Eyes.
- Create and save a Task List that will allow us to join a series of
observational Tasks in a form that can be used again and again.
- Implement the Task List to run a test observation.
Step 6. Connect Radio Eyes to the Telescope Control Point Program.
We must establish the communication link between Radio Eyes and the TCPP
to gain control of the telescope from the Radio Eyes graphical interface.
Radio Eyes will use the Telescope
Connection File (extension tci [telescope connection
information]) to establish this connection. To get Radio Eyes to use
a particular TCI file simply click the Telescope menu and select the top
submenu also called Telescope.
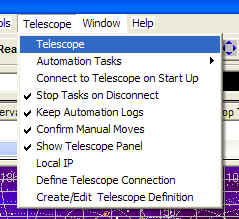
The Select Telescope Connection File dialog box should open to the Telescopes
subdirectory. Select the TutorialTelescope.tci file that we created in Step 4 of
this tutorial.

The Telescope\Telescope menu item should then reflect that the
connection file has been loaded.

Remember that we had selected the Run Local Control Point checkbox
when we created the Telescope Connection File (tci).
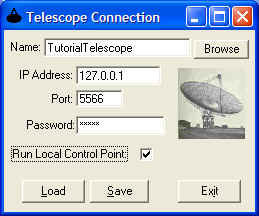
So if the TCPP was not running before it should have been launched
when we loaded this Telescope Connection File. Radio Eyes now has the
correct connection information and the TCPP is waiting for the actual connection
and log in. Press the connect button  to establish the connection. This can take several seconds to complete so be
patient before you begin pushing other buttons or taking other actions. Wait for
the hour glass cursor to completely go away. The connection button will
then look a little different
  indicating the
connection is now established. You can check on how the connection
progressed or failed by clicking the arrow on the Telescope Message list.
You might see something like this:
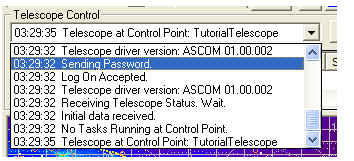
The important steps of the connection process to the TCPP are listed. Notice
that one of the items listed is "No Tasks Running at Control
Point". It is possible to connect to a TCPP that does already have
tasks running. In that case you will be prompted about whether you want to stop
these tasks. This TCPP was able to find and load a Telescope Definition File
(TDF) that corresponded to our request.
Step 7. Send a simple one-time move command to the telescope.
Now that we have a connection between Radio Eyes and the virtual telescope
(via the TCPP) we can try to make it move.
- In the Desired AZ box type a number between 1 and 359 and hit
Enter.

- The following dialog box should appear:
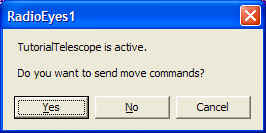
Click Yes.
- The next thing you see is the Edit Task box:
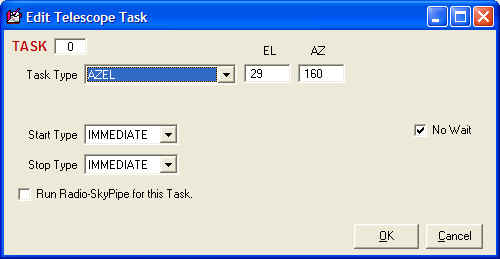
This gives you an opportunity to edit the Task which is by default a simple
request to move to the AZ and EL shown in the boxes. The Start
Type and Stop Type are by default immediate but you could change
then as well as the Task Type. For this simple move you will just
click OK.
- If all is well then then you will see the background color of the Task
List area turn bright green and you will see the move parameters
displayed. In the Current Task Number box you will see the same
bright green background and the letter 'm' displayed to indicate a
manual move.

- The beam pattern should begin moving to the new position. It is only
updated about once per second so the move appears a bit jerky. When the beam
is properly placed the green areas shown in the telescope control will go
blank again.
Step 8. Try some other methods of initiating one-time moves.
We just just accomplished a one-time (manual) move by typing a value in the
one of the Desired position boxes. If this was the best we could do
we might as well have just stuck with the TCPP program that also can take a
typed in position. What we really would like to do is take advantage of the
graphical nature of Radio Eyes. Try the following ways to initiate manual
moves:
- Right click on the chart anywhere in the above horizon area. Select
Place Beam. You will then be given the same dialog boxes shown in
tutorial step 7. This time however the AZ and EL correspond to the
position of the cursor when you pressed the mouse button. Finish the move.
- Right click on an object above the horizon and select Info from the
drop down menu. As usual, a list of nearby objects appears:

Right click on the object you want in the list and select Move
Beam To. Again the correct coordinates will be selected for the
current position of the object.
- You may be getting annoyed with answering that message box that questions
whether or not you want to send the move command to the telescope. You can
turn that off by un-checking Telescope \ Confirm Manual Moves.
Try it.
Step 9. Creating a Task List.
Tasks can be created in a more permanent form than the one-time manual tasks
we implemented above. You can add Tasks to a Task List that can be
saved or loaded from a file. Multiple Tasks can be stored in the Task List. The
idea here is that you can keep your telescope busy all day and night doing a
number of different observations without human intervention. The following
links will take you to help pages that will give you a good background on this
subject:
Now that you have memorized all of that (just kidding!) let's create a simple
task list.
- The Task List area is optionally displayed in the Telescope Control area.
The Hide / Show List button determines whether or not the Task List
is shown. If you do not see the Task List box click the Show List
button.
- Right click in the blank Task List box and you will see a drop down menu
like this one:
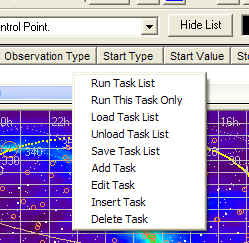
As you can see there are a lot of options in this list but lets choose Add
Task.
- The Task Editor box will appear with the heading "Add New
Telescope Task" in its title bar. You met this box when you were
running manual tasks. It is the same box but this time it will appear with
default RADEC values instead of AZEL values. The default Task Type will
be RADEC which means it will direct the antenna to a given right
ascension and declination rather than a given azimuth and elevation.
On the Object line you will also see RADEC listed. This
means that we are interested in a fixed coordinate and not the coordinates
of some object. Click on the drop down arrow of the Object box and you
will see the most common radio objects listed; the Sun, Moon, and Jupiter.
You can also type in any object name that exists in your loaded radio source
or pulsar catalog, but for now lets just leave the Object as the RADEC
object.
- Type a right ascension and declination into the input boxes at the top of
the Task Editor. Make sure the Start Type selected is IMMEDIATE.
Let the Stop Type be DURATION and lets give it a Stop Value of just 2
minutes (00:02:00) so we don't have long to wait for it to complete.
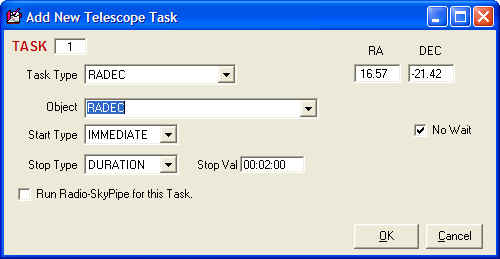
Then click OK.
- The Task will now appear in the Task List box. This is just a Task
List with one Task, but a Task List nonetheless. If you wanted to you
could save this "list" of one and recall it but we will add some
Tasks before trying that. Use the horizontal scroll bar at the bottom of the
Task List box to slide the Task to the left so that you may view the many
parameters that the Task possesses. Most will be blank or at default values
because we created such a simple Task.
- Now let's use the graphical interface to add a Task to the Task List.
Right click on an object above the horizon in the sky map and select Info.
The usual list with one or more objects should appear. Click on the object
in the list and it will become highlighted. Now right click on it and
select Add Task. A new Task Editor window will appear, this
time with the Task Type as TRACK, and the name of the object you
selected in the Object box. The RADEC of the object is automatically
inserted in the RA and DEC boxes.
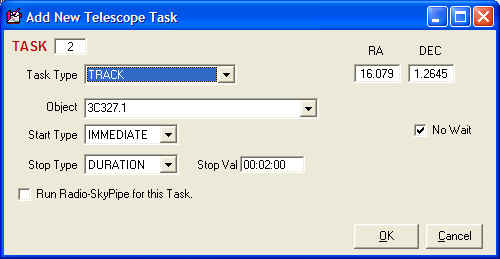
Notice this time the Task number in the upper left corner is 2.
- Click on the Task Type drop down list arrow and select DRIFT
as the Task Type. The Task Editor Window adds some options in response to
this. Change the Start Type to TRANSIT-. Change the Stop
Type to TRANSIT+. Pressing the Adjust to Beamwidth button
will add times to the Stop and Stop Value boxes that depend on the
declination of the source, the EW beamwidth of the telescope, and the
beamwidth multiplier factor immediately below the button. You might
want to use a multiplier of two to ensure time to establish baselines before
and after the drift scan. Just above the Adjust to Beamwidth button
notice the No Wait check box. If this is selected then the TCPP will
check to see if we are in proper time range for the Task and if we are not
it will skip the Task and move on to the next Task in the list. If No
Wait is NOT selected (ouch! a double negative) then TCPP
will just sit and wait for the Task time to begin.
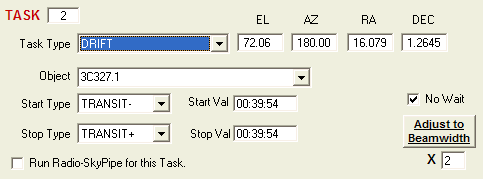
Click OK and the new task is added to the list.
- Let's add one more Task. Press CTRL+F on the keyboard.
A Find Source box will appear. Type in "taurus a"
(no quotes) and press OK or hit Enter. Assuming you have the object
in your loaded radio source catalog you should get:

The string we searched for is in the name of each of these objects so they
both appear in the list of found objects. Right click on Taurus A
and select Add Task. Again we get a Task Editor window. This
time lets leave the Task Type as TRACK. If you have the
Pro version of Radio-SkyPipe on your computer continue on. Otherwise go to
number 10 in this tutorial.
- Click Run Radio-SkyPipe for this Task. You
can read more about this automation using Radio-SkyPipe here. And you
may want to do this if you have not already done so. Fill in the newly
lengthened Task Editor window with the appropriate SkyPipe
information. Remember you will also have to have SkyPipe running and
properly configured to accept the commands from the TCPP.
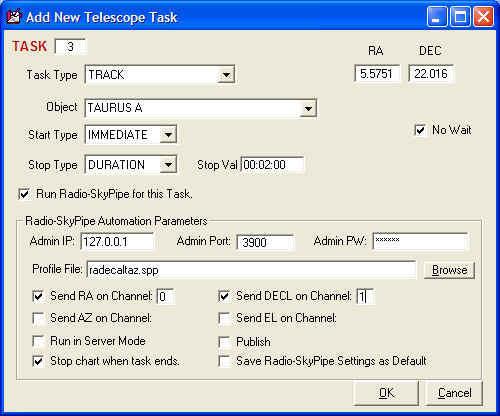
- Now that we have our Task list we need to decide it we want it loop
continuously or just run once. If you want it to loop the just add another
task with the Task Type as LOOP. This will send the TCPP back
to the top of the list to do it all again. Now save the Task List to
as a Task File (tsk) by right clicking on the
Task List and selecting Save Task List.
- If Radio Eyes is not already connected to the TCPP and telescope simulator
connect them now. If have forgotten how go back to step 6 above. If
you have been connected to the TCPP all along the then Radio Eyes has been
updating the TCPP with your new Task List. If you are just now connecting
then the Task List currently loaded in Radio Eyes will be sent to the TCPP.
Look at the TCPP and see if there are corresponding Tasks loaded. You can
click the up and down arrows in the Tasks frame to examine each Task.
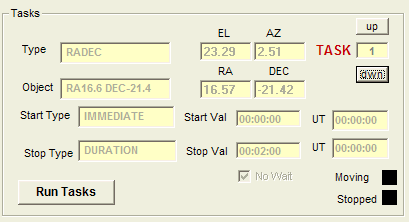
This is the Tasks frame in the TCPP.
- Finally we are ready for action! Right click on the Task List and
select Run Task List. The hour glass cursor should appear while Radio
Eyes gives the command to start running the Task List to the TCPP. The Current
Task Number box should have a bright green
background and the number 1 displayed. Details of the current
implementation of this Task can be obtained by double clicking the this box.
It is possible that the other Tasks will be run after this first Task, but
they might also be skipped depending on whether you elected to wait for them
or not in the Task Editor. But the important point here is now you
know how to create and run a Task List.
This ends this tutorial. Experiment more on your own using the virtual
telescope. Its nice to know you can't crash it into the ground or twist it off
its base while you are in learning mode.


![]() to establish the connection. This can take several seconds to complete so be
patient before you begin pushing other buttons or taking other actions. Wait for
the hour glass cursor to completely go away. The connection button will
then look a little different
to establish the connection. This can take several seconds to complete so be
patient before you begin pushing other buttons or taking other actions. Wait for
the hour glass cursor to completely go away. The connection button will
then look a little different ![]() indicating the
connection is now established. You can check on how the connection
progressed or failed by clicking the arrow on the Telescope Message list.
You might see something like this:
indicating the
connection is now established. You can check on how the connection
progressed or failed by clicking the arrow on the Telescope Message list.
You might see something like this:


