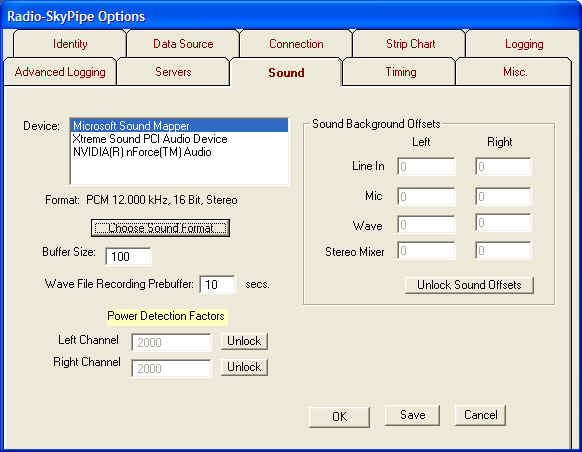

Configuration of most sound parameters occurs on the Options / Sound panel. There are several options associated with the sound card. These parameters support the three main functions of the sound card in Radio-SkyPipe II:
Sound envelope data recording in the strip chart.
Recording of the raw sound data in wav format.
The use of the sound card as a timing source for consistent spacing of samples.
Select a Sound Card
Radio-SkyPipe supports the use of multiple sound cards on a computer to the
extent that it allows you to select which sound card to use when more than one
is present. Radio-SkyPipe will only use one of the cards, though. That is,
you could not use one card for the first two channels and a second card for the
next two, for example. Available devices are selected from the Devices
list box as shown above. Note there are three entries in this device list.
The first entry, Microsoft Sound Mapper, is not really a sound card but
rather is a virtual device that maps to whatever sound card you have chosen as
your default audio device in the Windows Control Panel Sound and Audio Devices
applet. The following two cards really do exist on my PC.
Select a Sound Format
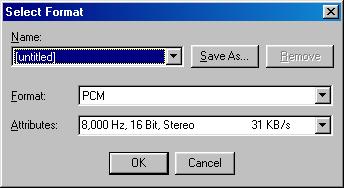
You must then select the sound
format which includes the sampling rate, mono vs. stereo, etc. This is done via
the dialog box obtained by pressing the Choose Sound Format button.

The Select Format screen allows you to choose from the registered sound formats on your computer. However, not every format will work for you. For most purposes it is suggested you select PCM format. In the Attributes selection list you will find a variety sampling rates 16 bit vs. 8 bit, and stereo/mono options. Radio-SkyPipe is designed to work with 16 bit sound cards so never select 8 bit. Higher sampling rates are used for high fidelity recordings and are generally not needed. Higher sampling rates can degrade the performance of R-SP and take much more drive space when being saved as sound files. The suggested rates are 12000 or 11025 Hz. Use stereo when using 2 channel sound data collection (Pro Edition users only). In addition to the effects that choosing the appropriate sound format has on data collection, the selected format will be used for recording wav files (Pro Edition only).
You may give your sound format selection a readily identifiable name (such as "SkyPipe Format"), and save it so that it will appear in the "Name:" drop-down list for easy selection.
Buffer Size - This option can be ignored when using the Sound Card as the Timing Source as the buffer size is then calculated automatically. When the program samples the audio signal passing through the sound card, it does so in little chunks. These groupings of sound card readings are in kept in a Buffer. When the Buffer is full, it tells the program to "read me!", and the average value of the samples in the Peak Buffer is saved as a single data point on the strip chart. What this means to the observer is that you can adjust the coarseness of the audio sampling. If the Peak Buffer Size is too large, you will not be able to use an rapid sampling rate. The suggested Peak Buffer Size for most uses is 100 to 1000.
Wav File Recording Prebuffer
Radio-SkyPipe II can record wav files from audio being processed by the sound
card. The Wav File recorder is designed for situations when the observer
is present as well as unattended observations. When the observer is present he
or she may record sound files of events as they occur. Reaction time when
pressing the record button necessarily means that some of the sound event you
want the record has passed by the time you start the recording. The wav
file recording prebuffer solves this annoying problem by maintaining a circular
buffer of the incoming sound. If you set the prebuffer to a length of 10 seconds
for example, then when you press the record button the recording will also
include the 10 seconds of sound that occurred prior to pressing.
Power Detection Factors
When using the Power detection method with a sound card data source, a factor
may be applied to scale the output to some meaningful units. You need not
worry about this factor unless you are calibrating the input. Calibration
for simple radio sound output can be achieved using the Jove Calibration Wizard
found under the Tools menu. Read
about detection methods here.
Sound Background Offsets
Some sound cards output a continuous value or a noise signal even when no signal
is being processed by the card. This signal can produce significant errors
in some times of data collection, especially those that use power detection
where the soundcard output is squared. You can test your sound card for
this issue very simply by creating a strip chart with no input to the sound card
(by unplugging the line In, for example). If the resulting chart is close
to 0 then there is no problem. If the result is above perhaps 20 or 30
then you might want to offset this value. This can be done manually or using the
Sound Background Null tool. More information is contained on the help page
for that tool.