In order to keep the desktop presence of the clock small the menu is triggered by Right Clicking on the clock face, (not the title bar - that is used for dragging the clock to a different place on the desktop). This right-click drop-down menu has the following items:
Close - Closes the program.
Minimize - When minimized the clock should appear in the task bar with the time display and icon. Click on this taskbar button to restore the program.
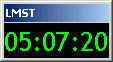
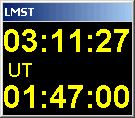
Display UT - Paid version feature that allows you to also display Universal Time below the Sidereal Time as shown below.
Configure - Brings up the configuration window explained below.
Calculator - This is a paid version feature that allows you to calculate corresponding Sidereal and Local/UT times for anyplace or any date. Read more about this below.
Alarms - This is a paid version feature that triggers on screen alerts at specified sidereal times. Read more about this feature below.
Upgrade - Takes you to the Upgrade panel where you can begin the upgrade process. The panel contains a link to the upgrade page on this website where you can purchase the upgraded version of this program for just $14. Once you have upgraded, this menu item will no longer appear.
The About Box gives version information and links to this website and help page.
To configure the clock RIGHT click the digit display and select Configure from the drop down menu.. A small configuration screen appears.
Manual Time Zone Configuration - Deselect Detect TZ Automatically if necessary. Enter your time zone in hours variance from GMT (UT) . For example if your local time runs 6 hours behind Greenwich Mean Time, you would enter -6. If your time preceded GMT by two hours you would enter 2. If Daylight Savings Time is in effect for your location you must take this into account.
Automatic Time Zone Configuration - Select the Detect TZ Automatically checkbox to have the program determine the time zone from your operating system settings. The program will also attempt to make any correction needed for Daylight Savings Time.
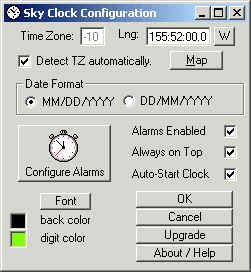
Longitude - Your longitude may be entered as a decimal value or as a sexagesimal value (HH:MM:SS format). West longitude values increase as you travel west from Greenwich England. Press the W-E button next to the longitude box to display/enter the longitude in East longitude values. Longitude values are always positive with this scheme.
The Map button will take you a another window where you can find your longitude and time zone by a couple of different methods. Read more about this below.
Colors - Click on the colored boxes to change the digit or background color of the clock.
Font - Click the Font button to change the style and size of the font used for the clock digits. The size of the clock should automatically adjust to the Font after you update. Implemented in version 1.6.0 and above.
The Auto-Start check box sets the program to automatically start when Windows starts by placing a RUN entry in the registry. Un-checking the box sets the program to be started manually.
The Always on Top check box makes the clock appear on top of other program windows that occupy the same desktop space.
The Alarms Enabled checkbox is a global over-ride to turn off all alarms when deselected. This feature applies to paid users.
The Configure Alarms button brings up the Alarms/ Alerts Setup window. This feature applies to paid users.
The Date Format option buttons select the date format for the Sidereal Calculator. This feature applies to paid users.
To save changes you should press the OK button. This help page is available as link from the About page. There is also a link to the Radio-Sky website. Of course, you must have a browser and an internet connection for this to work.
Sometimes you may want to know the sidereal time for a different location or for some fixed time in the future or past. Conversely you may wish to find out at what time of day a particular sidereal time will occur at a given location. This can be useful for planning future astronomical observations. This is the purpose of the calculator. To access the calculator select Calculator from the right-click menu on the main clock face.
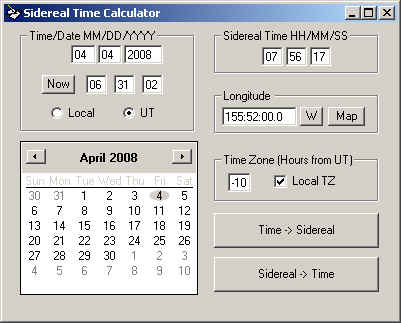
The window shown above will appear. At the upper left is the Time/Date display. The date will be displayed according to you preference for the display format as selected in the Configuration Window. Below the date are the hours minutes and seconds boxes and a convenient button the will set these to the current system time of your computer. The date can also be selected on the calendar panel at the bottom of the calculator window. Two radio buttons allow selection of either Local or Universal Time (UT).
The calculated or input Sidereal Time is displayed in the box at the upper right.
Longitude can be entered in decimal or HH:MM:SS format in the Longitude box. Longitude can be expressed in East or West coordinates by clicking the E/W button just as done on the Configuration Window. Also included is a Map button that brings up the Map Window as described below. Changes you make here in the calculator do not affect the coordinates or time zone parameters for your desktop sidereal clock. These coordinates are temporary and only used in the calculator.
The Time Zone can be entered manually or the local system time zone can be selected by clicking the check box labeled Local TZ.
The two function buttons convert from the specified Local or UT time to Sidereal or from Sidereal to Local / UT time.
Close the calculator by clicking the X button on the top of the window.
Paid version users can set Alarms (or Alerts) that are triggered at set Sidereal Times. These Alarms can perform the following functions:
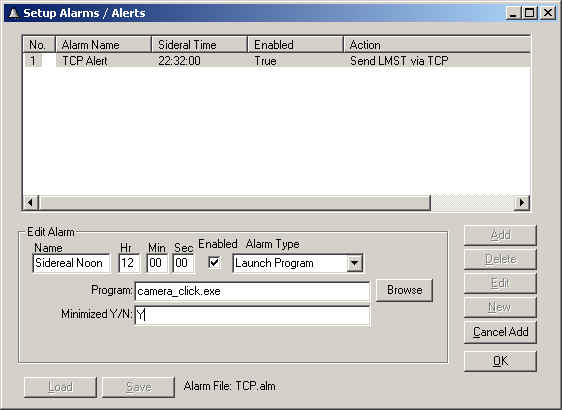
The Alarms / Alerts Setup window can be accessed from the right-click menu on the clock face or from the Alarms configuration button on the Configuration Window. A version of the window shown above will be displayed. (Here it is shown after the Add button has been clicked).
Alarms are stored in files in the Sidereal Clock directory with .alm extension. These are simple text files that can be examined and understood to some extent with a simple text editor. The Load and Save buttons at the lower left of this window is used to access the files. The currently loaded alarm file is displayed to the right of these buttons.
The Add button adds a new alarm to the current alarm file. The characteristics of the alarm are defined in the Edit Alarm box below the alarm list. Select an alarm type from the Alarm Type drop down list. Up to three parameter fields will be displayed below the Alarm Type list depending on which alarm type is elected.
Every Alarm must be given a unique name in the Name box. Failure to supply a name that is unique in the alarm list can lead to problems in alarm execution.
The sidereal time of the alarm is entered in the Hr, Min, and Sec boxes.
You must have the Enabled check box selected for the alarm to actually be functional.
The current sidereal time can be passed to an Alarm in the top parameter. To do this you specify a specific string in the parameter text. To pass the current sidereal time in HH:MM:SS format to the Alarm you would include the following string in the text of the parameter:
[LMST HH:MM:SS]
For example, if you passed the alarm a message parameter of Wake Up its [LMST HH:MM:SS] Sidereal Time!!! the message box might read:
Wake Up its 12:43:01 Sidereal Time!!!!
To pass the sidereal time in decimal format you can use [LMST Hours] and the time will appear in the Alarm as 12.7169, that is in decimal hours. You can also pass any predefined formatting string used in Visual Basic. The formatting string will be applied to the decimal hour form of the LMST. For example, [LMST 00.0] would produce 12.7 for the same time.
Similarly you can also use Universal Time (UT) in your alarms using variations on the format: [UT HH:MM:SS]
To use the Add, Delete, or Edit buttons you must select the number of the alarm you wish to edit in the far left column of the alarm list!
The New button unloads the current alarm list and begins a new one. If you do not save the changes you make to an alarm file the alarm list loaded on the next startup of the sidereal clock will be the old un-modified version, so save your changes unless you want them to be temporary.
Note that ALL alarms will be disabled if the Alarms Enabled check box in the Configuration Window is not selected. This is a global over-ride to the individual Enabled parameters of the alarms.
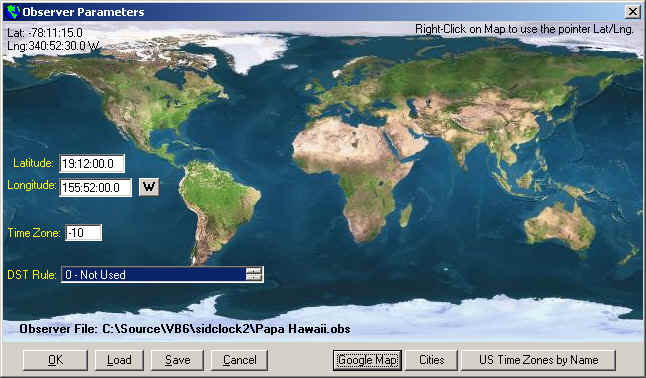
The Observer Parameters (Map) Window can be selected from the Configuration Window to aid in setting your location and time zone for your home location and from the Calculator Window for selection of these parameters for a specific calculation. Three numbers are returned from the The Observer Parameters (Map) Window ; the longitude, time zone, and a Daylight Savings Time Rule (DST Rule). The DST Rule is mostly useful for determining the local time of a location other than your own for a given time of year. The latitude is not used to calculate sidereal time but is useful for other purposes.
The "Map" Window has many features. Moving the mouse over the map displays the geographical coordinates of the mouse pointer at the upper left of the screen. If you are satisfied with this level of accuracy you can right-click the mouse to apply the longitude of the mouse pointer to the longitude box. longitude
Double-clicking on the map will launch a Internet Explorer window to the Google
Maps™ location you are pointing to! You can also retrieve a Google Map by
using the Google Map button at the bottom of the window. In this the map
is centered on the coordinates specified in the Latitude and Longitude check
boxes and not the mouse pointer position. Currently retrieving the latitude and
longitude from the Google Map is not straight forward., but it can be sometimes
done with a little trick. Right click on the Google Map in your browser where
you want to determine the coordinates. If the location is on a street move away
from the street a bit or this trick won't work. Select Directions From
Here from the drop down menu. Now move the the mouse anywhere else on the
map that is not near a road. Right click again and select Directions To Here.
You should get a display something like:
We could not calculate driving directions between Lani Kona Rd @19.200553,
-155.866592 and 19.201319,-155.866567.
The first set of coordinates ( I marked them in red here) is the one you want. The first number is latitude and the second number is longitude. If the longitude has a minus sign, make sure your Observer Parameters window has W longitude selected as the display mode. Copy the longitude to the longitude box and edit out the minus sign. The latitude can be copies straight to the Latitude box in the Observer Parameters Window.
To target a list of major cities click the Cities button then select a region. A cities list for that region will appear. Select the city from that list. Sorry we don't have all cities in the list. The US Time zones can be selected by name (such as Eastern Standard Time) by clicking the US Time Zones by Name button.

Select the time zone and click OK. If you do not know the time zone for your location you may try the following web site: http://www.timeanddate.com/worldclock/
You can load and save location information from the the Map Window into observer files (*.obs). Use the Load and Save buttons provided for this purpose.
HOME | BEGINNERS | JUPITER | SOLAR | PULSARS | PROJECTS | FAQ | BOOKS | SOFTWARE | SUPPORT | LINKS | CONTACT