Radio Eyes Telescope Control Tutorial
This tutorial takes you through the steps of creating a observation task
list, connecting to a telescope, and running the observation tasks.
Prerequisites
Your computer must have Win98 or better. Radio Eyes is a busy
program and so it is best to use a fairly fast computer with plenty of
memory. Your computer must be LAN or Internet enabled even if it is not
connected to a network. It must be at least able to communicate internally using
TCP protocol.
For the purposes of this tutorial the telescope will be a virtual telescope,
not a real one. We will use the ASCOM telescope simulator program shown
below.
You must thus have the ASCOM platform installed on your computer. You can get
the ASCOM platform at: http://download.ascom-standards.org/ascom41.exe.
In addition to the telescope simulator the ASCOM software will provide
support for telescopes and planetarium programs that comply with the ASCOM
standard. Think of this standard as a common language that can be used by
computers and computer controlled telescopes. Radio Eyes uses a limited
vocabulary in this language that allows it send Azimuth and Elevation commands.
You must have version 1.2.1 or higher of Radio Eyes installed on your
computer to run this tutorial. In addition, you should either have
purchased a Level 2 Radio Eyes License or be in the free demo period of a
software update to run functions related to telescope control.
Run Radio Eyes. You should see Telescope as one of the main menu items
at the top of the window.
If you do not see this then you have an older version of Radio Eyes, or you do
not have a telescope control (level 2) registration. If you would like to
try out the telescope control functions and have gone beyond the demo period,
please contact me and I will issue you a new demo period license.
Step 1. Get Acquainted with the Radio Eyes Telescope Interface.
Click the Telescope menu and select Show Telescope Panel or just press the
toolbar button  . You should see a new panel
appear that looks like this:
The message list on the left is updated often when control related messages are
generated by Radio Eyes , the Telescope Control Point Program, or the Telescope
Driver. You can look at past messages by clicking the drop down arrow. On the
far right are EL and AZ readouts that report the antenna position from the
connected telescope or the sky map's drawn beam position when a telescope is not
connected. Next to these "Reported" readouts are text boxes that
can be used to type direct antenna "Desired" position requests.
These Desired position boxes also take information programmatically from
graphically requested moves and from Tasks. The black box is not always black.
It reports the current task number being sent to a connected telescope, or will
show a "m" if a manual move has been issued. You can double click the
Current Task Number box to get more details. Finally, the Show List button
will show or hide the Task List area. Press the Show List button.

A new area appears in the Telescope Control panel. This is where the details of
Tasks are displayed. What is a Task? Read this for a full explanation, but
basically is something you want the telescope to do. Tasks have so many
parameters that they just will not fit on the screen and so a horizontal slider
allows you to scroll left or right through the task parameters. Right clicking
on this Task List area will bring up a drop down menu that will be discussed
later.
While there is much more to learn you should appreciate the simplicity of
this interface within Radio Eyes to a radiotelescope. In order to keep the
interface from occupying much of the viewing area, it was necessary to rely
heavily on drop down menus and submenus. Try hovering over items for tips
and right clicking on them during different stages as you are getting acquainted
with the program.
Step 2. Define a Telescope
You can read about telescope
definition files here. And you can get a detailed explanation of the Telescope
Definition Creator / Editor tool here. To use a telescope for
this tutorial we need to define the telescopes characteristics using this tool
and save it in a telescope definition file (tdf) in the Telescopes subdirectory
of Radio Eyes. Follow these steps:
- Click Telescope \ Create/Edit Telescope Definition on the Radio Eyes main
menu.
- The Telescope Definition Creator tool appears. In the Telescope Name box
type: TutorialTelescope as one word. Do not use spaces in your telescope
names.
- You can leave the many of the fields at their defaults take note of them
all and refer to the references above for anything that is not understood.
- In Move Sequence click Az then EL.
- In the Latitude and Longitude fields place your coordinates. The W button
can be changed to E for east longitudes.
- Place beamwidth values in the EW and NS Beamwidth boxes. Keeps these
at a few degrees for demonstration purposes.
- Press the Browse button next to the Driver text box and select the
ASCOM_Rotator_Driver.exe and press Open.
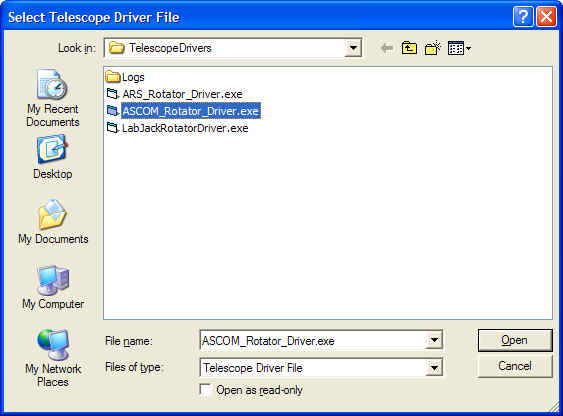
- Notice that the root of the driver file name minus the .exe extension is
what is used in the Driver textbox. Now type ScopeSim.Telescope in the
Device INI textbox.
- Click the Save button and save the telescope definition file as
TutorialTelescope.TDF.
- Click Exit on the Telescope Definition Creator tool.
You have now defined a telescope in a tdf file in the Telescopes
directory! You may be thinking, "How did I know what to type in the
Device INI box. Excellent question! Every telescope driver will have its own set
of initialization parameters. This information will be made available for
each Driver. For ASCOM telescopes this will be a class name for the particular
type of telescope. If you do not know the class name and leave this INI
parameter blank then a Telescope Chooser list will pop up when the TCPP
tries to load the driver.
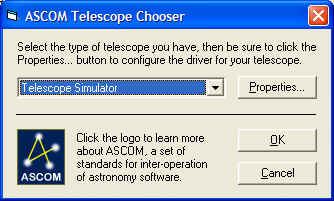
This Telescope Chooser is another tool in the ASCOM download. It is
better to put in the name of the telescope class in the INI to prevent the need
for human intervention while the TCPP loads the driver.
Note: The Telescope Definition Creator/Editor
tool is available both from Radio Eyes and the TCPP.
Step 4. Define a Telescope Connection
OK, we have a file created that will define our telescope for the TCPP.
Radio Eyes no longer needs to know anything about the definition other than its
name. But Radio Eyes does need to know how to get in touch with the
TCPP and tell it which telescope definition to load. That is the purpose of the Telescope
Connection File (tci). You can read about specifics of the Telescope
Connection Creator/Editor tool here, but our job in this tutorial is to dig
in and simply create the file so we can use it.
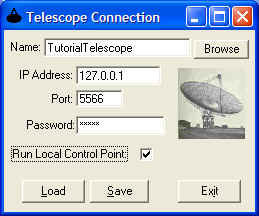
- Click Telescope \ Define Telescope Connection on the Radio Eyes main menu.
- A blank Telescope Connection Creator tool will appear. Click the Browse
button on the Tool next to the Name box.
- Select the TelescopeTutorial.tdf file and click Open. Notice that
the Name box now contains the root of the tdf file name but not the
extension. This is expected.
- In the IP address box type 127.0.0.1. This is the standard
"loop back" address that exists on most every network enabled computer.
- In the Port box type 5566. If this port is being used on your
computer type another one, but jot the number down because you are going to
need it when you configure the TCPP.
- In the password box type something you will remember so it can be applied
to the TCCP later. This is the password that the TCPP uses to verify
that you are a trusted controller of the telescope.
- Check the Run Local Control Point box and your result should look like:
- Click Save and save the file as TutorialTelescope.tci.
Step 5. Set up the Telescope Control Point Program.
The Telescope Control Point Program (TCCP)
can be studied in detail here. Think of the TCCP as your trusted telescope
operator, Corky. No matter at what observatory this operator is located
you can count on being able to call him (or her up) and tell them, "Corky,
please use the Tutorial Telescope and perform a drift scan on Taurus A
tonight." Corky asks you for a password just to make sure it is
really you that is calling and then says "Sure thing, Boss! I will do it at
the appropriate time and send you back the telescope coordinates as I change
them."
There are many things that Corky needs to know to do his job. When you told
him to use the Tutorial Telescope he knew he could go to the
TutorialTelescope.TDF file to get the specifics on how to start the telescope
and move it. He also finds out from this file its limitations so he
doesn't try to move it too far in a given direction. This means that Corky has
to have the right TDF file ( telescope definition file ) at his location, so if Corky is in a different building
from yours (or a different country) then you need to make sure that he has the
file installed on his computer. In our example, Corky and you are sharing the
same computer so all is well.
In addition Corky needs a phone number for you to call him on, or in this
case an IP address and Port number. So lets set that up. Go to Start\ Programs\
Radio Eyes 1\Radio Eyes Control Point and run it. If for some reason you do not
have this menu item, then you should create a shortcut for the
RE_Control_Point_1.exe program that lives in your default Radio Eyes
directory. Whatever you have to do, run the program.
- Click Network in the main menu at the top of the Control Point Program and
select Listen IP.
- Type in 127.0.0.1 and select OK.
- Click Network again and choose Listen Port.
- Type in 5566 or whatever you used above when defining the telescope
connection file.
- Lets do the Password while we are in here.. Network\Password.
The TCPP main connection parameters IP, Port, and Password are now
defined. Corky knows what phone to answer and what password to use. Now
lets run a little test to see if we can talk to our TutorialTelescope.
- Click File / Load Telescope.
- If all is well we should see TutorialTelescope listed as a TDF file.
Select it and press Open.
Hopefully, a bit of activity will take place and you will receive notice that
are connected to the Tutorial Telescope in two places on the TCPP. 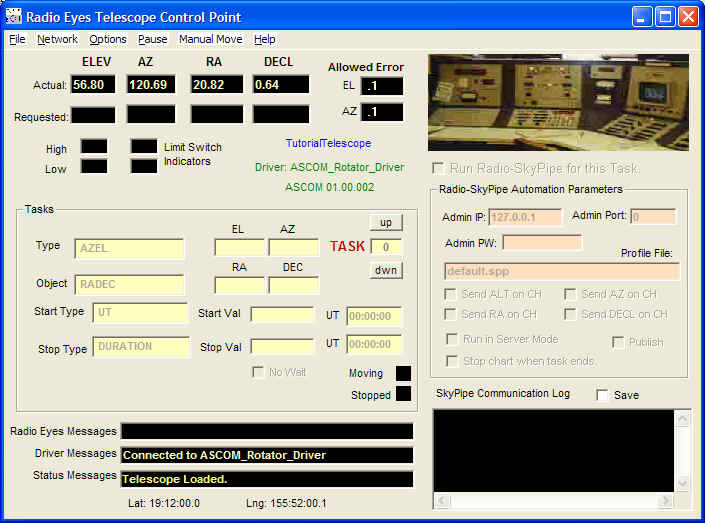
In blue you will see TutorialTelescope near the upper middle and at the
bottom you will see the status messages related to the connection. If you fail
to see this then something is probably wrong in the definition file (TutorialTelescope.TDF)
, or the ASCOM_Rotator_Driver.exe file is not in the \TelescopeDrivers
subdirectory.
If you do see these signs of success then you will also notice a Scope
Simulator icon in your task bar. Click on it and the Scope Simulator interface
will appear as shown below.
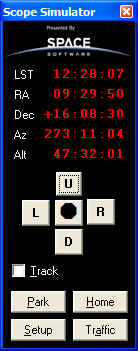
Try clicking the Up - Down, and Left - Right buttons on the simulator. The
Actual EL , AZ, RA, and DEC values should change in the TCPP to correspond with
the numbers in the simulator. This is equivalent to using manual steering
on a real telescope. Now go to the TCPP and type a legitimate value in the
Requested Elev text box, 22 for example. Do the same for the
Requested Az box, perhaps 180. Now at the top menu select Manual Move and the
click AZEL. The Actual position boxes begin to change until the telescope
reaches the requested position. You can run the same tests with Requested RADEC
values but if the chosen RADEC is below the horizon the scope cannot comply.
Click File / Unload Telescope on the TCPP main menu. Then quit the TCPP
program.. for now.
Briefly we have done the following so far:
- We created a Telescope Definition File (*.tdf) that the TCPP will use to
determine how to control the telescope.
- We created a Telescope Connection File (*.tci) that Radio eyes will use to
find and log into the TCPP, and to tell the TCPP which telescope definition
to use.
- We used the TCPP directly (without the help of Radio Eyes) to start up and
move the Telescope Simulator.
At this point you can move the virtual telescope and you might think,
"Hey, what do I need Radio Eyes for?" If you stop now you will
be missing the best part; creating Tasks graphically in Radio Eyes and passing
them to Corky, err.. I mean the TCPP via a connection.
Continue on with the Tutorial Part 2


