Radio-SkyPipe Help
The Windows Mixer Panel (Volume Control) and Radio-SkyPipe
For Radio-SkyPipe II versions we suggest you
use the Radio-SkyPipe Mixer instead of the
the Windows mixer panel, however, in some situations the Radio-SkyPipe mixer may
not work for you and you may need to use the Windows Mixer panel or a mixer
program supplied with your sound card.
The most common application of Radio-SkyPipe software (so far!) involves
graphing a sound signal supplied from some external source like a radio via the
computer sound card. Most Windows computers with sound cards installed
will have a piece of software called a "mixer panel". The mixer panel
may also be known as the "volume control". The mixer panel is similar
to those hardware mixers we are used to seeing in recording studios. Its
main purpose is to route and adjust the volume from a variety of input
"devices" which supply audio signals to possible outputs.
Input devices include CD Players, wav files, microphones, and most importantly
to us the Line In of the sound card. The output we usually think
about is the sound output of the sound card that supplies audio to our system
speakers or headphones. However, for our purposes, we can also think of
the Radio-SkyPipe program as an output.
Accessing the mixer panel (volume control)
If you have the mixer panel installed on you computer, you may see a small
speaker icon like the one shown below in the system tray.
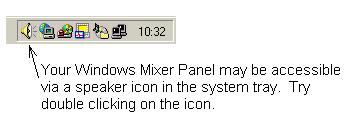
If no icon appears in the system tray, look under Programs / Accessories /
Entertainment (or possibly Multimedia) under the start button for a
listing called "Volume Control" . Note that it may use a
different icon than that of the speaker. If you can't find it this
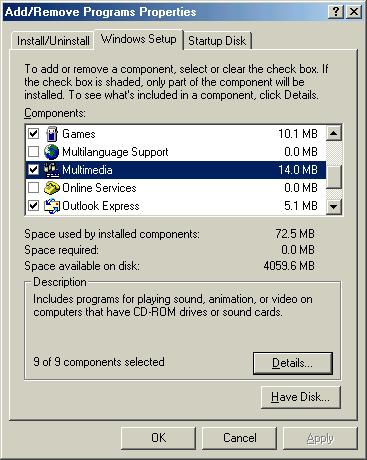
anywhere, check to see that it has been installed on your computer from your
Add/ Remove New Programs icon under Control Panel. Below is a picture of a
Windows Me Add/Remove New Programs window. The Windows Setup tap is
selected. Scroll down to the Multimedia item in the components list.
If it is not selected, you should select it. You may need your original
Windows setup CDROM at this point to install all of the Multimedia components.
Some sound cards come with their own mixer panel software which replaces the
Windows mixer panel. The setup and usage of these specialized mixer panels
cannot be predicted here. If you have one of these, you may find that
there are similar settings available to those in the Windows mixer panel, but
there is no guarantee.
How to find the Right Controls
As mentioned above, the mixer panel is also referred to as the volume control
in various menus in Windows. This is confusing. In fact, there are
several confusing aspects to the operation of the mixer panel. First, if
you bring up the program via a single click, rather than a double click from the
system tray icon, you may get a single you will get a small panel like the one
below:

This acts as a quick and simple master control for the speaker output
volume. You can't do much with this little incarnation of the mixer panel.
Double Click the icon to get the more elaborate and useful controls.
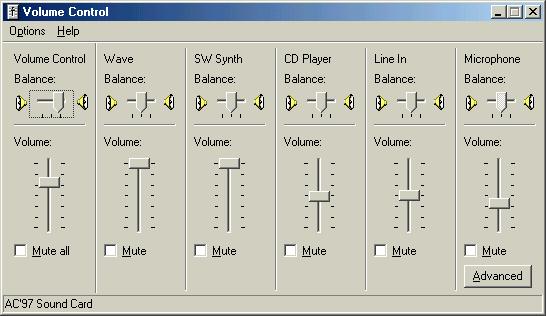
When you get the full mixer panel it will look something like
the one above. The names and number of slider controls on this screen will
probably be different. This default panel controls which possible sources
of sound are fed to the computer speakers. In the version above a master
volume control appears on the left and affects the volume from all of the listed
devices. You can mute any of the devices with the appropriate check
box.
Hidden away is another set of controls that we really need to get to in order
to make sure we are properly piping sound from the sound card to the
Radio-SkyPipe program. To get to this Record side of the mixer
panel, click the Options menu item at the top left of this "Volume
Control" panel. Then select Properties from the drop down menu.
You will then be presented with the panel below:
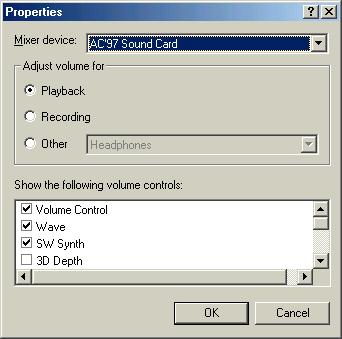
We aren't there yet, but there are some things to note about this Properties
screen. First note that there is a drop down list at the top called Mixer
device. This totally inappropriately named item actually refers to the
sound card that the mixer panel refers to. If you have multiple sound
cards they may appear in that list. (Believe me, if you think the
terminology for this is confusing, you should see the terminology used in
programming of these things!)
Below, this is the area titled "Adjust volume for" that
contains radio buttons for "Playback", "Recording",
and "Other". We are interested in the "Recording"
or input side of things so select that. But before clicking OK look at the list
titled "Show the following volume controls:". Scroll the
list and make sure the "Line In" control and make sure it
is checked. Then press OK.
The following panel (or something similar) should appear:
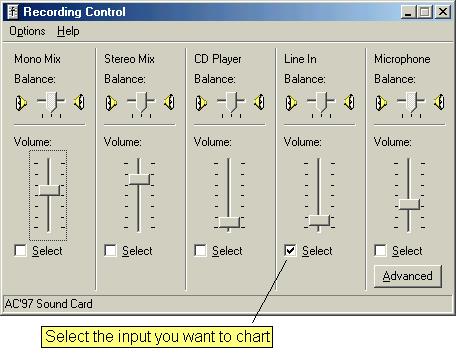
This is the "Recording Control" side of the mixer panel.
Select the "Line In" control if you are bringing the sound you want to
record in through the Line Input jack on the sound card. The vertical
volume slider adjusts the sensitivity of the input. Think of it as a
preamplifier volume adjustment. You may also see Mono Mix, Stereo Mix controls
like the ones shown here that control levels from all possible input
devices. These controls work in conjunction with the individual volume
controls for the possible input devices. Both will affect the level seen by
SkyPipe. These controls may have different names than the ones shown. Unfortunately,
there is no standard naming convention for the controls and different sound
cards may show very different control names. Experiment with the controls. You
can do this while SkyPipe is running.
Once you get things set, they should stay set unless you change them or they
are changed programmatically by another program that uses the mixer.
Return to Radio
SkyPipe Help Contents
Go to Radio-Sky Home Page


