Radio-SkyPipe Help
Note: this help page assumes you have installed assumes that you have installed Radio-SkyPipe version 1.1.26 or greater.
Running any special internet based software from behind a firewall can be challenging. Firewalls by their very nature block incoming traffic of all but the most generic types such as browser and ftp sources. If you are the administrator of the firewall, you can usually make allowances for special programs to get their traffic through. Here in my home/office we use Microsoft's Internet Connection Sharing (ICS) software to allow all of the computers on our LAN to use a single internet connection. ICS comes free with Windows Me and Win98 Second Edition. ICS is essentially a firewall/router. Until recently, I had to turn off (disable) ICS to act as a Radio-SkyPipe server.
If you would like to read about setting up an ICS network see:
http://www.practicallynetworked.com/sharing/ics/icsinstall.htm
ICS comes with no published way to configure it so that it will pass other than certain specific types of internet traffic. Fortunately, there is now a piece of third party software available which will allow you to configure ICS to pass Radio-SkyPipe and other special software traffic. The program is called ICSCFG and is written by Harley Acheson. You should pick up the program at:
http://www.practicallynetworked.com/sharing/ics/icsconfiguration.htm
You may use the software for free, but a $10 donation is suggested to help support the author's work.
The rest of this help page will assume you have downloaded and installed ICSCFG. It also assumes that you have installed Radio-SkyPipe version 1.1.26 or greater and are using Microsoft ICS software as your LAN internet connection sharing program. To save a lot of typing we will call the computer connected directly to the internet via a modem/DSL/or Cable connection, Computer A. Other computers on your LAN, that is those connected to Computer A, but not the internet directly, will be referred to as Computer B.
1. Install ICSCFG on Computer A if you have not already done so. Run it.
2. Click the Add (+) button on the main panel.
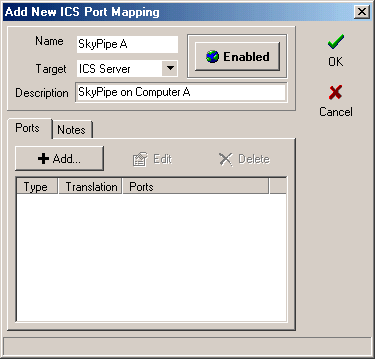
3 An "Add New ICS Port Mapping" panel will appear

Type in a name for your Computer A connection. Leave the target as ICS Server, and put in a description something like shown above.
4. Click the Add (+) button on the "Add New ICS Port Mapping" panel. An "Add New Port Panel" will appear as shown below.

5. Put your Local Server Port Number form you Radio-SkyPipe Options/Connection Panel. In this case, the Local Server Port is designated as 1730. The Transport Protocol should remain TCP and the Data Translation should remain Normal.
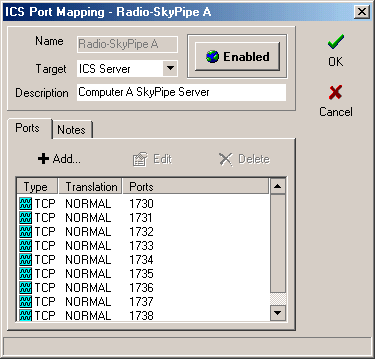
6. Repeat steps 4 and 5, each time incrementing the port number by 1 until you have a number of ports defined which is equal to you Radio-SkyPipe Max Clients parameter plus four. For example, I have my Options/Connection/Max Clients parameter set at 10, so I added fourteen ports to the ICS Port Mapping. Remember to keep the numbers sequential.
7. When you are done adding ports it should look something like the panel below:

Click OK to add your new Port Mapping to ICSCFG.
8. If you are only concerned Computer A send SkyPipe Data then you are through mapping ports and can skip down to Step 10.
9. If want to add SkyPipe ability to Computer B, you will add another port mapping to ICSCFG for that computer. Follow steps 2 through 7 with the following differences:
10. After all the ports have been mapped and you have closed ICSCFG, reboot Computer A.
11. Run Radio-SkyPipe and go to the Options/Connection panel. Click the Client Port Options button.
12. Uncheck the box that says "Let Radio-SkyPipe select client ports automatically."
13. In the port entry box at the top of the Advanced Client Connection Options panel, put a port number which you compute as the Local Server Port + Max Clients +1. Following my example the number would be 1741, because my Local Server Port = 1730 and my Max Clients = 10 (1730 + 10 + 1). You can see that the client port still falls in the top of the range of port numbers you allotted to Radio-SkyPipe in ICSCFG.
14. Click Save in the Advanced Client Connection Options panel.
15. Computer A and B will have slightly different options set on the Options / Connection panel. For Computer A, set as follows:
Computer B will be configured as follows:
15. Click Save on the Options / Connection Panel.
That's it.
One Little Problem....
One thing you discover with set up is that you cannot connect Computer A in Client Mode to the data stream of Computer B in Server Mode. ICS won't allow you to connect to yourself passing outside to the internet (at least not from Comp A to Comp B). If you want to see Computer B from Computer A, you have to configure for an internal only session. You can't have it both ways.
To switch over to an internal only session, do the following:
On Computer B
In Options/Connection change the Connection Type to "I use a LAN but I don't want to use the Internet." Everything else stays the same or gets grayed out.
On Computer A
Set up an entry for Computer B in your Private Servers List. Use the permanent IP address you assigned to Computer B. Make sure to use the right Local Server Port you assigned on B's Options / Connection page.
Run Computer B in Server Mode. Don't Publish it even if it allows you to.
On Computer A go to Client Mode and select B from the Available Servers List.
You Can Go Back
To go back to the setup where A and B will be visible to others on the internet. You just reselect "I use a LAN, DSL, Cable Internet Connection. " on Computer B.
Return to Radio SkyPipe Help Contents