For our purposes, an event can be an chart segment showing a significant signal that you want extract from the larger chart for submission to a data store of events . Someone monitoring temperature or other slowly varying value might not have need to extract portions of their charts, and may have no need to keep any particular part of their charts. However, if you were looking for sudden drop outs of signal such as when monitoring Sudden Ionospheric Events, then an event might be that segment of the chart that shows a sudden decline in signal followed by the slow recovery period. An event could be a single spike, if that is what you were looking for with RSP. Events are the portions of your chart that are of interest to you and you want to save.
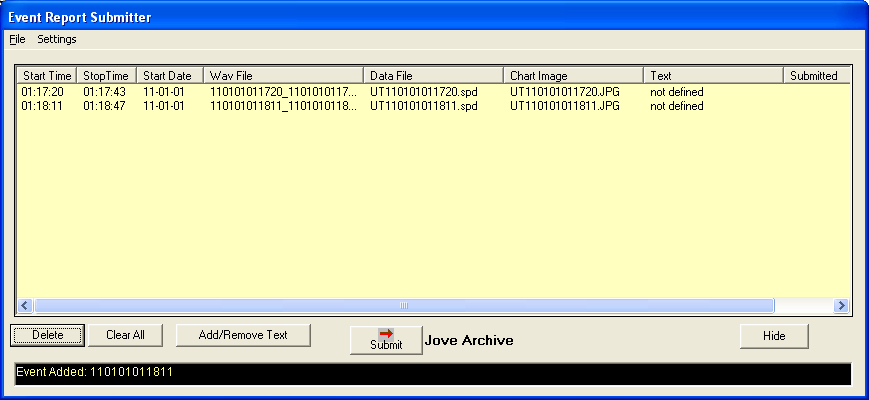
The RSP Event Report Submitter (ERS) helps organize event data that you “define” within a larger chart. It then can send the data to a network based database. Four types of data may be sent; chart data in spd format, pictures (jpegs) of chart segments, and sound files if they exist for each event segment, any text attachment you wish. The Event Report Submitter arose from a need to make Jupiter and Solar submissions to the Radio Jove Project Archive in a less labor intensive way. While this is the original intent of the system, it can be used to send data to other custom databases. It does of course require that the appropriate software exists on a web server to accept and process the uploaded files.

Defining an event is essentially the process of establishing its time boundaries. This is accomplished by visually scanning the observation chart and selecting areas that look as though they may represent the kind of phenomena you are interested in. You may use the control arrows to scroll through the chart or use the Zoom Box control to select different regions. If the RSP data file has an associated sound file, you may use the right mouse button to select “Play Wav for this View” option from the drop down menu. In the case of some radio astronomy signals, this is very useful in identifying what is desired signal and what is interference. Once you have established that the current chart view contains your desired data, right mouse click again on the chart and select “Define Event”.
Several things will happen:
The visible portion of the chart will be saved as it's own spd data file.
A snapshot of the visible chart region will be saved as a jpeg image file.
Any sound associated with the region will be saved as a wav file. If the wav file is larger than an adjustable limit, then it can be automatically cropped to that limit.
All of these automatically created files will be saved in a new sub-directory of the source observations directory. This sub-directory will be named “Events”.
A list of these files and related information is sent to the Event Report Submitter window.
If you have elected to, the chart will be returned to a full view of the entire observation and the Zoom Box automatically reselected and ready for your next event definition. The area(s) of the chart that have event definitions are given a distinctive background color.

The Event Report Submitter accepts references to the
files produced when you defined your events by the above procedure. Specific
events in the ERS may be selected by clicking on them. Events can be deleted
from the list singly or all at once using the Clear All button. You may also use
the ERS to launch a text tool that adds a text file to the list of files
associated with the event. This text tool is similar to the Observer Log window.

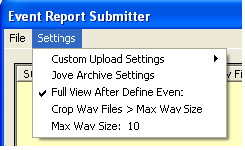
Custom Upload Settings apply to usage of the ERS with databases other than the Jove Archive. You can read about these settings here.
Jove Archive Settings are those parameters that are needed by submissions to that database. You must be a member of the Radio Jove Project and obtain a private log in to participate.
Full View After Define Event automates a change to a full chart view after each event is defined. The Zoom box is at the same time automatically selected and the user is ready to zoom in on another promising region of the chart for close inspection.
Crop Wav Files > Max Wav Size will shorten the wav file for a given event so that it may pass the upload restriction represented by the Max Wav Size setting. The Max Wav Size is set in megabytes. The default is 25 MB for the Jove Archive.
Note that if you deselect the Crop Wav Files > Max Wav Size option, the Max Wav Size limit is still imposed but the file is not automatically truncated. Instead, the user is alerted when defining the event of the maximum chart duration that may be used to stay beneath the wav file size limit. To make life easier the chart is automatically re-sized to this width.
If you have ever submitted observation data to the Jove Archive, you are aware that there are many fields that must entered. Some fields will change for a given submission while others such location will generally remain the same. It is also possible that the observer will have different setups for Solar vs. Jupiter observations. Using the ERS you may automate much of this tediousness so that only a few mouse clicks are necessary.
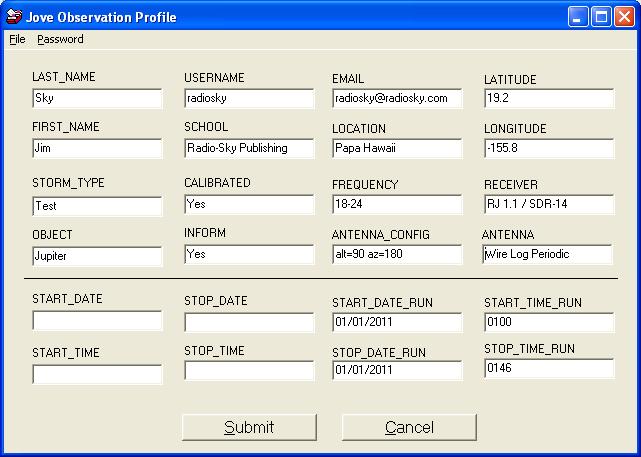
You may set up multiple Radio Jove Profiles ( jvp extension) to handle your different experimental setups. These can be developed at any time using the Jove Archive Settings menu item in the ERS. A window like the Jove Observation Profile window below will appear. Fill in all of the fields except the time fields that appear below the horizontal line. These fields are filled in automatically for each Event as it is submitted. You will also need to enter your password as was given to you by the Jove archive manager. Save the profile using File / Save Jove Observation Profile.

You will be presented with this form each time you
submit to Jove Archive, allowing you to make last minute changes pertaining to
the observation.
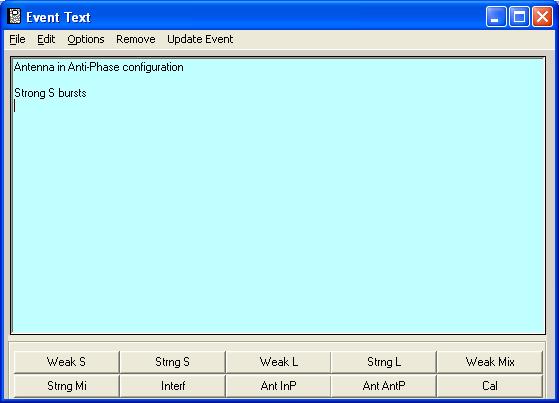
The Jove Archive allows for submission of text documents with observation files. This allows you to add special notes about an observation such as equipment settings, reception conditions, or notes about the event itself. If you wish submit text files with your observations you may attach them prior to submission. Simply select the event in your list on the ERS and click the Add/Remove Text button. When adding text a specialized screen appears that is similar to the Observation Log.

This is a simple text editor in which you can type
your comments. Macro buttons are provided to ease inclusion of commonly entered
information. Define the macro buttons under Options . You may also import
text from other files.
After you have the text the way you want it you should click the Update Event menu item at the top of the window. You are prompted to save the text with a suggested file name and then asked to confirm the addition of the text to the files submitted for the selected event.
When you have finished defining all of the events for the observation and have added any text you might desire, you are ready to make your submission. Next to the Submit button at the bottom of the ERS screen you should see the words “Jove Archive”. If not it probably says “undefined”. Click the label and “Jove Archive” should appear. Now click the Submit button. You will again see the Jove Observation Profile screen. Change any parameters that need changing, but do not enter the dates and times. Click the Submit button at the bottom of the Jove Observation Profile window. You will be given progress indications in the ERS status bar as the files from each of the event definitions is uploaded.