Radio Eyes Help

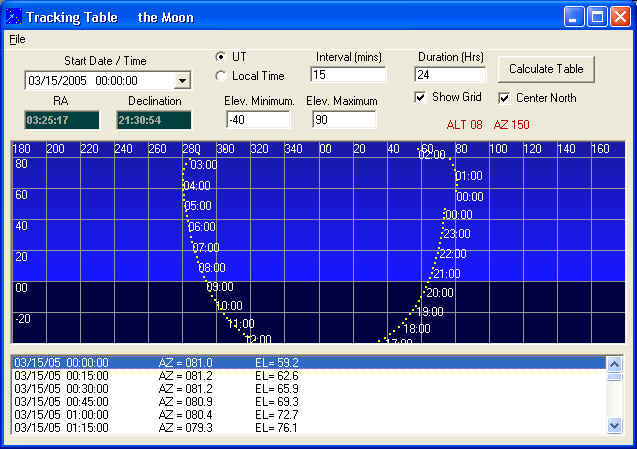
Very often we are interested in the movement of astronomical objects in the local sky over time due to the rotation of the Earth. Where will the object be in my sky at a particular time? The tracking table tool helps with this problem by plotting the elevation (altitude) and azimuth of an object over time. The tool can output a custom formatted text file containing AZEL information for a selectable time period and selectable intervals.
If before opening the Tracking Table tool, you beginning Tracking or use the Point To feature, the RA and Declination text boxes will be automatically filled with the position information.
If before opening the Tracking Table tool, you beginning Tracking the Sun, Moon, or Jupiter the RA and Declination text boxes will be locked. This is because these objects constantly change in coordinates at rates which could affect the table output. For these objects, the RA and Declination is recalculated each time a table entry is calculated.
To open the Tracking Table click Tools and then Tracking Table from the programs main menu. You may select a time and date from the calendar tool at the upper left of the window. Select UT or Local radio buttons to designate the time type that will be output.
Enter the interval in minutes between table calculations in the Interval text box. Enter the number hours of information to include in table in the Duration text box. The Elevation Minimum and Elevation Maximum text boxes offer a way to limit the table to include only entries within a given elevation range.
You can select whether the graphical representation centers on North (0 degrees azimuth) or South (180 degrees azimuth) using the Center North checkbox. When unchecked the graph will default to centering on South.
Customizing the Tracking File

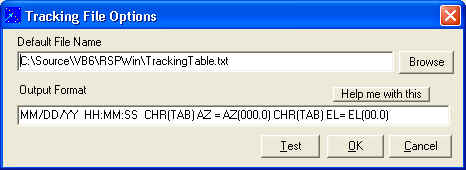
The text output format of the Tracking Table tool may be customized using a formatting string. This is done under File / Output Options. The panel shown above will appear. The browse button is used to establish an output file name. The formatting string is entered into the Output Format text box. For details on constructing a formatting string click here.
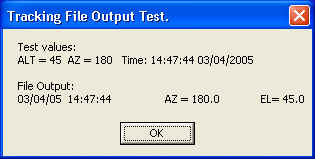
After you have entered a formatting string, press the Test button and a test dialog box (shown below) will appear.

Click OK to clear this test dialog box and either click OK to keep your new format string or Cancel to return to the Tracking Table tool.